

Are you tired of digging through a tangled mess of earrings in your drawer every time you want to find a matching pair? Do you struggle to find a way to display your favorite earrings as a stylish accessory? Look no further! In this blog, we will share 10 creative and practical solutions to help you organize and showcase your earring collection.
The Importance of Displaying Your Earrings
The way you choose to display your earring collection can have a significant impact on your overall decor. Displaying your earrings can add a personalized touch to your space while showcasing your unique style. A well-displayed earring collection can become a statement piece in any room, elevating the ambiance and adding a pop of color and texture.
Having your earrings on display can save you time and energy when getting ready. Instead of digging through a haystack of earrings in your drawer, you can easily find the pair you need when they are displayed in a visible and organized way. By showcasing your earrings in a beautiful display, you can also make a fashion statement and show off your personality to anyone who enters your home. It also serves as a great way to protect your jewelry, especially if you have precious gemstones that could get damaged. Overall, displaying your earrings is a simple yet effective way to enhance your style and decor while making your life easier.
14 Earring Display Ideas
We have compiled a list of 10 creative and practical earring display case ideas that cater to a variety of styles and preferences.
These diy projects would be great for:
- College dorm rooms
- Vanity area
- Bed side table
- Bathroom
- Air bnb(convenient for earring wearing guests. Just remember to clean it regularly)
- Back to school room decor
- teenager’s room
- Closet
Each idea will be accompanied by pictures and easy-to-follow instructions so that you can create your very own unique earring display.
Picture Frame Earring Display:
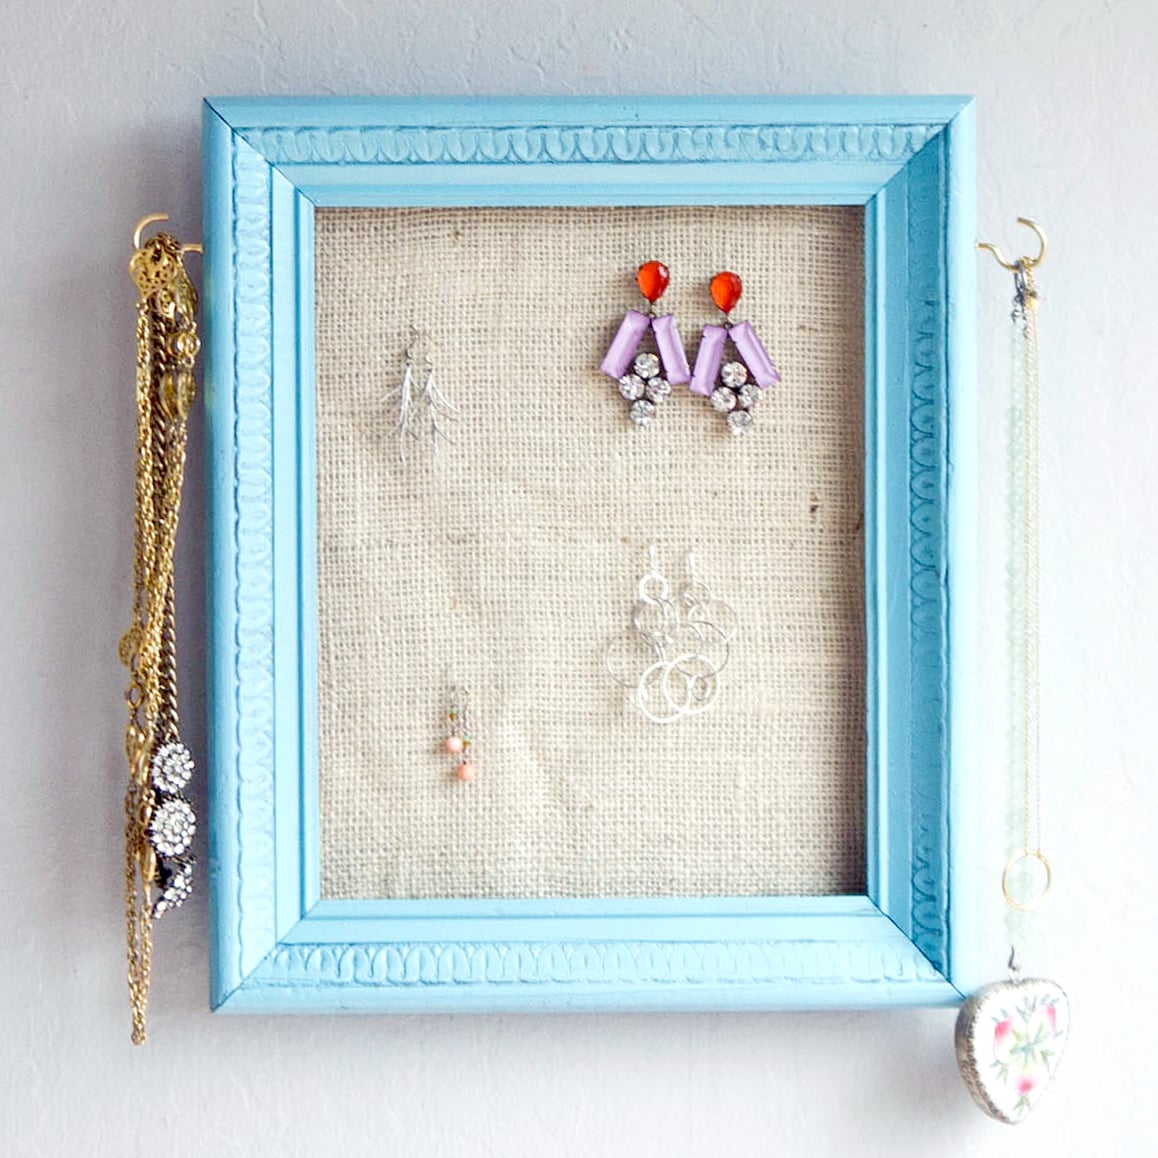
Repurpose an old picture frame by adding wire mesh or chicken wire to create a stunning earring display. Hang the frame on the wall or prop it up on a shelf for an eye-catching piece of decor.
Materials:
- Old picture frame
- Wire mesh or chicken wire
- Wire cutters
- Staple gun
- Scissors
- Optional: paint, sandpaper
Instructions:
- Choose an old picture frame that fits your style and the number of earrings you want to display. Remove the glass and backing from the frame.
- Measure and cut the wire mesh or chicken wire to fit the size of the frame. Leave an extra inch or two on each side to ensure it fits securely.
- Using a staple gun, staple the wire mesh or chicken wire to the back of the frame. Start at one corner and work your way around, making sure the mesh is taut and secure.
- If desired, you can paint the frame or distress it with sandpaper for a more vintage look.
- Hang the frame on the wall using picture hangers or prop it up on a shelf or dresser.
- Add your earrings by sliding the earring hook through the mesh or chicken wire. You can organize them by color, style, or any other way that suits your preference.
Your stunning earring display is now complete and ready to showcase your collection in a beautiful and organized way!
Lace Earring Display:
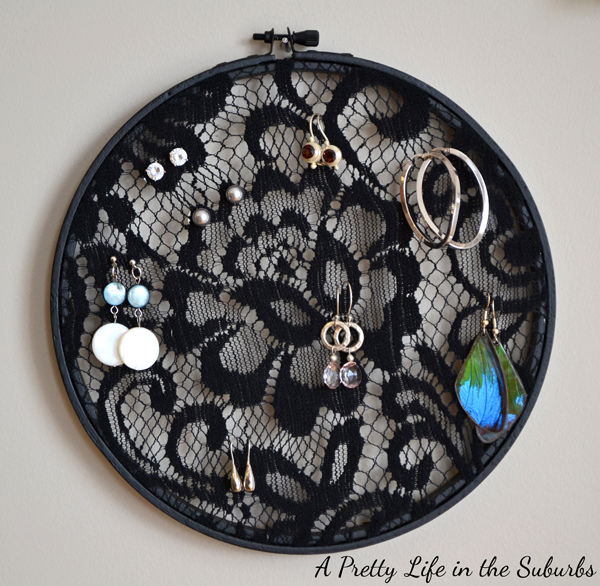
Add a touch of elegance to your space by using lace fabric to create a soft and feminine earring display. Simply stretch the lace over a frame or hoop and attach your earrings using mini clothespins or hooks. This display is perfect for a bedroom or dressing room. here are the step-by-step instructions to make a lace earring display:
Materials:
- Lace fabric
- Embroidery hoop or picture frame
- Mini clothespins or hooks
- Scissors
Instructions:
- Take your embroidery hoop or picture frame and loosen the fastening mechanism so that the inner ring can be separated from the outer ring.
- Cut a piece of lace fabric to a size slightly larger than the size of the hoop or frame.
- Lay the fabric over the inner ring of the hoop or frame and pull it taut, making sure that there are no wrinkles or sagging.
- Place the outer ring over the fabric and inner ring and tighten the fastening mechanism, ensuring that the fabric remains taut.
- Trim any excess fabric around the edges of the hoop or frame.
- Attach your earrings to the lace fabric using mini clothespins or hooks.
- Hang your lace earring display on the wall in your desired location.
You can experiment with different sizes of hoops or frames and types of lace fabric to create a unique and personalized display.
Jewelry Tree Earring Display:
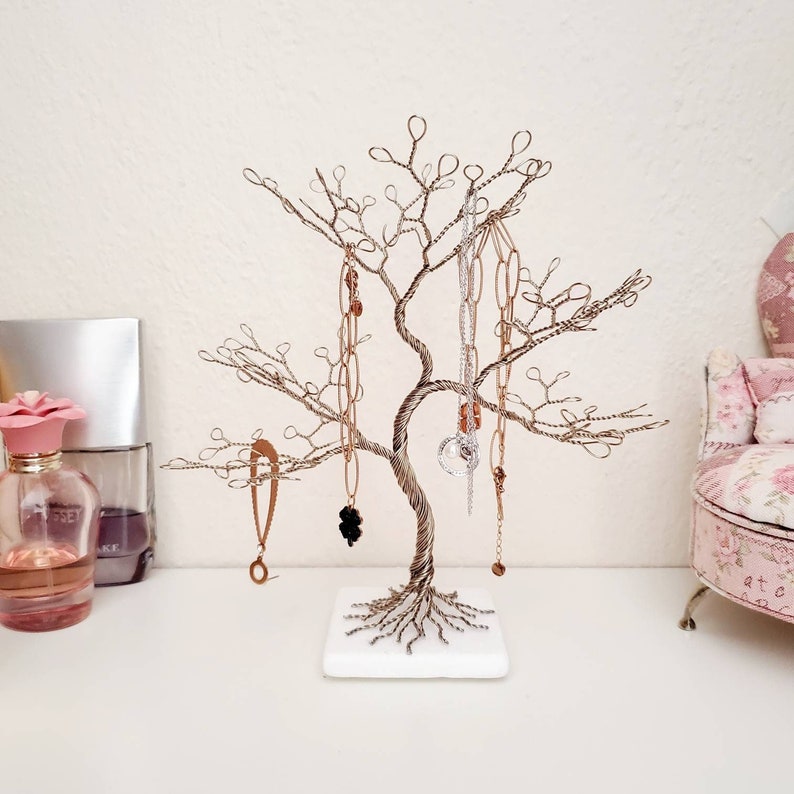
Use a jewelry tree to hang your earrings for a functional and stylish display. Jewelry trees come in various sizes and styles, from classic metal designs to wooden or ceramic options. This display is perfect for those who prefer a minimalist and modern look.
Here are the step-by-step instructions for using a jewelry tree to create a functional and stylish earring display:
Materials:
- Jewelry tree
- Earrings
Instructions:
- Choose a jewelry tree that fits your style and the size of your earring collection.
- Start by hanging your larger and statement earrings on the bottom branches of the tree. This will help balance out the display and prevent it from looking top-heavy.
- Work your way up the tree, hanging smaller earrings as you go.
- Try to space out the earrings evenly, so the display looks neat and organized.
- If you have multiple pairs of the same earring, consider grouping them together for a more cohesive look.
- Stand back and admire your new earring display!
Pro Tips:
- You can also use the branches of the jewelry tree to hang other jewelry, such as necklaces and bracelets.
- If you have a lot of earrings, consider using multiple jewelry trees or combining them with other display options for a larger, more comprehensive display.
By following these simple steps, you can turn a jewelry tree into a functional and stylish earring display that showcases your collection and adds a unique touch to your decor.
Vintage Tea Cup Earring Display:

Add a touch of vintage charm to your space by using a vintage tea cup and saucer to display your earrings. Simply glue the cup to the saucer and use the cup to hold your earrings. This display is perfect for a shabby chic or cottage-style decor.
To make a vintage tea cup earring display, follow these steps:
Materials:
- Vintage tea cup and saucer
- Earrings
- Super glue or a hot glue gun
Instructions:
- Clean the tea cup and saucer thoroughly to remove any dirt or dust.
- Apply a small amount of glue to the bottom of the tea cup.
- Carefully center the tea cup on the saucer and press down firmly.
- Allow the glue to dry completely, following the manufacturer's instructions.
- Once the glue has dried, arrange your earrings on the cup in a way that looks aesthetically pleasing to you.
- Use the cup to store your earrings and display them on a shelf or vanity.
Tips:
- You can use any type of tea cup and saucer to make this display, but vintage or antique options will give it a unique and charming look.
- Make sure to choose a tea cup that is large enough to hold all of your earrings.
- If you're worried about the earrings falling out, you can glue small pieces of felt or foam to the bottom of the tea cup to create a more secure base.
With these simple steps, you can create a beautiful vintage tea cup earring display that adds a touch of charm to your space.
Pegboard Earring Display:

Create a customizable and functional display by using a pegboard and hooks to hang your earrings. This display is perfect for those with a large earring collection and limited space. Pegboards can be painted to match your decor or left as is for a modern and industrial look.
To make a pegboard earring display, you will need the following materials:
- A pegboard (size can vary depending on your preference)
- Hooks (size and style can also vary depending on the size of your earrings)
- Paint (if you want to paint the pegboard)
Here are the steps to create your own pegboard earring display:
- Start by cleaning your pegboard to remove any dust or debris.
- If you want to paint your pegboard, choose a color that matches your decor and apply the paint evenly using a paintbrush or roller. Let the paint dry completely before moving on to the next step.
- Once the paint is dry, decide on the placement of your hooks. You can create a pattern or design of your choice, or simply place them randomly.
- Insert the hooks into the pegboard, making sure they are secure and can hold the weight of your earrings.
- Hang the pegboard on a wall or place it on a flat surface, and start hanging your earrings on the hooks.
You can purchase a pegboard and hooks at your local hardware store or online retailers like Amazon or Home Depot.
Wine Cork Earring Display:
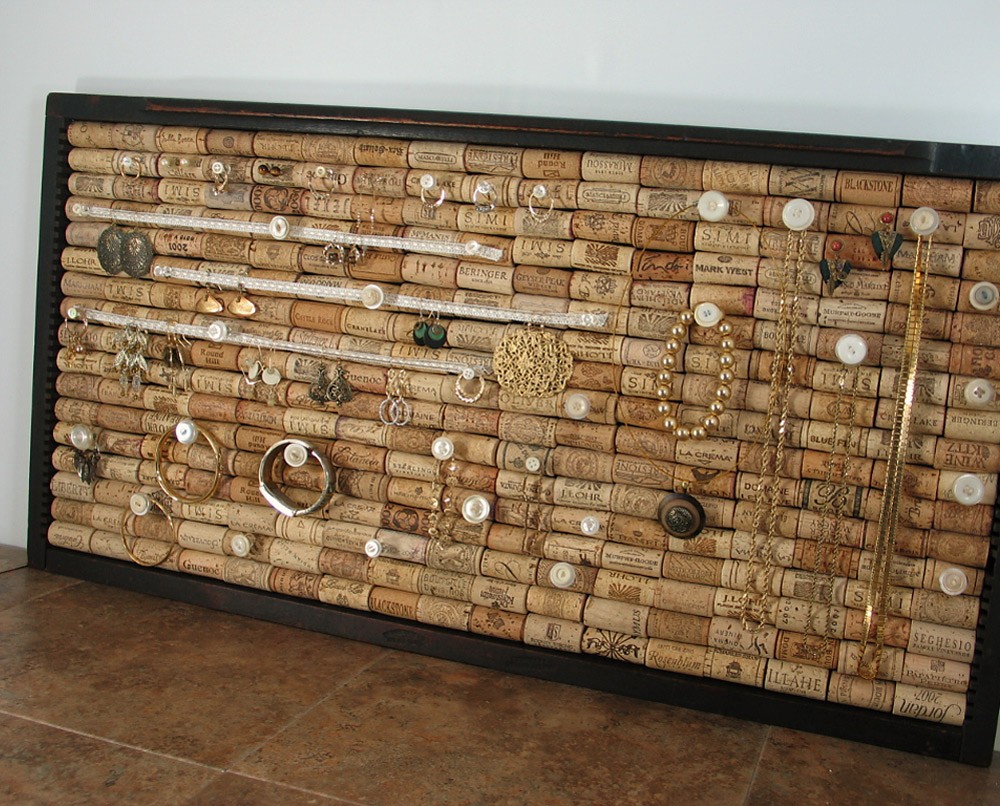
Repurpose old wine corks by attaching them to a wooden frame or board to create a unique and eco-friendly earring display. Simply poke holes in the corks and insert your earrings. This display is perfect for wine lovers and those with a rustic decor style.
Here are step-by-step instructions for creating a Wine Cork Earring Display:
Materials:
- Wooden frame or board
- Wine corks
- Knife or scissors
- Glue gun
- Sandpaper
- Paint or stain (optional)
- Hanging hardware (optional)
Instructions:
- Start by collecting enough wine corks to fit your wooden frame or board. The number of corks needed will depend on the size of your frame or board and the spacing between the corks.
- Cut the corks in half lengthwise using a knife or scissors. This will create a flat surface to attach to the wooden frame or board.
- Sand the cut edges of the corks to make them smooth.
- If desired, paint or stain the wooden frame or board in a color that complements your decor. Allow the paint or stain to dry completely.
- Arrange the corks on the frame or board, spacing them out evenly. Once you are happy with the placement, use a glue gun to attach each cork to the frame or board.
- Allow the glue to dry completely.
- Insert your earrings into the cork halves.
- If desired, attach hanging hardware to the back of the frame or board and hang it on the wall.
Where to buy items:
- Wooden frames or boards can be purchased at craft stores or online retailers such as Michaels, Hobby Lobby, or Amazon.
- Wine corks can be collected from your own wine bottles or purchased in bulk from craft stores or online retailers such as Etsy or Amazon.
- A glue gun, sandpaper, and paint or stain can also be found at craft stores or online retailers.
Branch Earring Display:
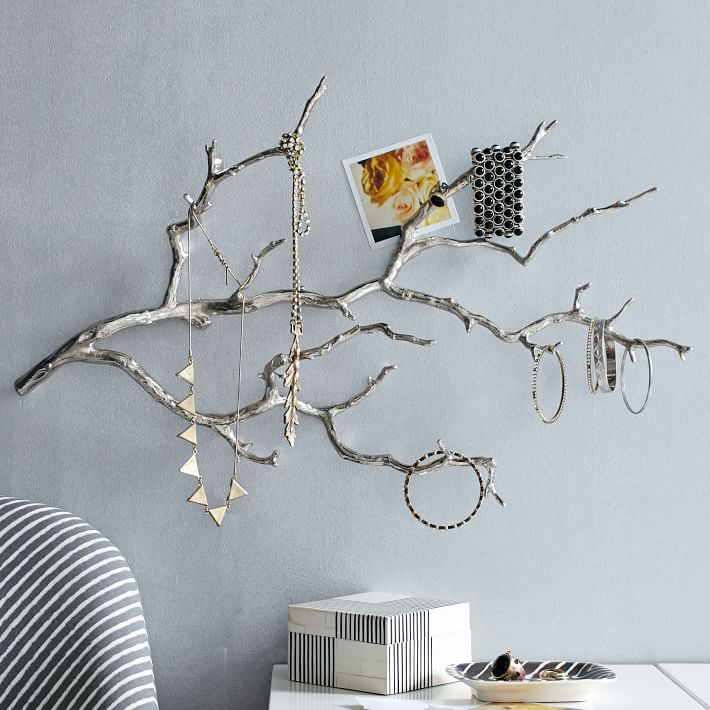
Bring a touch of nature into your space by using a small branch or twig to create a natural and organic earring display. Simply attach the branch to a base or stand and hang your earrings from the branches. This display is perfect for those who love the outdoors and a bohemian decor style.
Here are the step-by-step instructions for creating a branch earring display:
Materials:
- Small branch or twig
- Base or stand (such as a wooden block or vase)
- Saw
- Sandpaper
- Drill with small drill bit
- Ribbon or string
- Spray can paint
- Earrings
Steps:
- Select a small branch or twig with multiple branches or smaller offshoots.
- Use a saw to trim the branch to the desired length and shape.
- Sand any rough or sharp edges of the branch with sandpaper.
- Spray with colour of your choice. Or don't. Its up to you!
- Use a drill with a small drill bit to make small holes in the branch where you want to hang your earrings.
- Tie ribbon or string around the branch or attach it to a base or stand to stabilize it.
- Hang your earrings from the branches and adjust as needed.
To find a base or stand, check your local craft store or thrift store for unique and interesting options. The Etsy webpage provided in the prompt also has a variety of branch earring displays available for purchase if you prefer to buy one already made.
Grid Panel Earring Display:

Use a wire grid panel and hooks to create a versatile and customizable earring display. Grid panels come in various sizes and colors and can be arranged in various ways to suit your space and style. This display is perfect for those who like a minimalist and modern look. Sure! Here are the step-by-step instructions for creating a grid panel earring display:
Materials:
- Wire grid panel
- Hooks
- Pliers
- Command hooks (optional)
Instructions:
- Measure the space where you want to hang your earring display and choose a wire grid panel that fits the space.
- Determine how many hooks you need for your earrings and purchase them accordingly. You can find hooks at your local hardware store or online.
- Use pliers to attach the hooks to the grid panel. Place the hooks in a pattern that suits your style and preferences.
- Hang the grid panel on the wall using Command hooks or another secure method.
- Hang your earrings on the hooks and adjust them as necessary.
Optional: If you want to add some extra flair to your display, you can attach photos, postcards, or other small items to the grid panel using small clips or clothespins.
Upcycled Drawer Earring Display:

Repurpose an old drawer by adding dividers and hooks to create a functional and unique earring display. Simply paint or decorate the drawer to match your decor style. This display is perfect for those who love to upcycle and repurpose old items.
Here are the step-by-step instructions to create an upcycled drawer earring display:
Materials:
- Old drawer
- Sandpaper
- Paint or decorations (optional)
- Small hooks
- Wooden dowels or sticks
- Hot glue gun
- Divider materials (e.g. foam board, cardboard, or thin wood)
Instructions:
- Remove any hardware or knobs from the drawer.
- Sand down any rough areas or edges on the drawer to create a smooth surface.
- Paint or decorate the drawer as desired. This step is optional but can add a personal touch to the display.
- Cut the divider materials to fit inside the drawer. The dividers should create small compartments to hold your earrings.
- Hot glue the dividers into place inside the drawer.
- Attach small hooks to the sides of the drawer or to the dividers. These hooks will hold your earrings.
- Cut wooden dowels or sticks to fit inside the drawer. These will serve as additional earring holders.
- Hot glue the wooden dowels or sticks to the inside of the drawer, leaving enough space between them to hang your earrings.
- Hang your earrings on the hooks and wooden dowels or sticks.
Where to buy items:
- Old drawers can be found at thrift stores, garage sales, or online marketplaces like Facebook Marketplace or Craigslist.
- Sandpaper, paint, and decorations can be found at home improvement or craft stores.
- Small hooks and wooden dowels or sticks can also be found at home improvement or craft stores. The hooks should be small enough to fit on the sides of the drawer or on the dividers without being too visible. The wooden dowels or sticks should be thin enough to fit through the holes of your earrings.
DIY Cork Board Earring Display

If you have a cork board lying around, you can transform it into an earring display case in no time. All you need is a few pushpins and you're good to go. Pin your earrings onto the cork board and you'll have a chic and practical display. Plus, you can easily switch out your earrings whenever you like.
Here are the step by step instructions and materials list for making a DIY Cork Board Earring Display:
Materials:
- Cork board
- Pushpins
- Ruler
- Scissors
- Optional: Paint or fabric to cover the cork board
Instructions:
- Clean the cork board surface and remove any debris or dust.
- If desired, paint or cover the cork board with fabric. Allow time for the paint or glue to dry completely.
- Using a ruler, measure out where you want to place the pushpins on the cork board. Make sure to space them out evenly.
- Carefully insert the pushpins into the cork board at each marked point. Be sure to press them in firmly so they hold the weight of the earrings.
- Hang your earrings onto the pushpins in any arrangement you prefer. You can also add labels or markers to indicate where each pair of earrings belongs.
- Enjoy your new earring display! The best part about this display is that you can easily switch out your earrings whenever you like.
Note: If you have a lot of earrings, consider using multiple cork boards or a larger board to accommodate your collection. Also, you can add additional embellishments to the board such as ribbon or other decorative items to make it more personalized to your taste.
Vintage Cheese Grater Earring Holder

Repurpose an old cheese grater by spray painting it and attaching it to a wooden base. The holes in the grater make for a unique and interesting display for your earrings. This option is perfect for those who love vintage or rustic decor.
Here are the step-by-step instructions on how to make a Vintage Cheese Grater Earring Holder:
Materials:
- An old cheese grater
- Spray paint (color of your choice)
- Wooden base
- Epoxy glue
- Sandpaper
- Optional: Decorative elements such as ribbons or buttons
Instructions:
- Clean the cheese grater: Start by cleaning the cheese grater with soap and water to remove any dirt or grime. Allow it to dry completely before moving on to the next step.
- Sand the cheese grater: Using sandpaper, gently sand the cheese grater to create a smooth surface for painting. Wipe off any dust with a clean cloth.
- Paint the cheese grater: Spray paint the cheese grater with your desired color. Allow the paint to dry completely before handling.
- Glue the cheese grater to the wooden base: Using epoxy glue, attach the cheese grater to a wooden base. Make sure the grater is centered and level on the base. Allow the glue to dry completely before moving on to the next step.
- Add earrings: Once the glue is dry, start adding your earrings to the grater's holes. You can arrange them by color or style to create a visually appealing display.
- Optional: Add decorative elements: You can add ribbons or buttons to the wooden base for added decoration.
Where to buy items:
- Old cheese grater: You can find old cheese graters at thrift stores, garage sales, or online marketplaces like eBay or Etsy.
- Spray paint: Any hardware or craft store should have a variety of spray paints available.
- Wooden base: Craft stores or home improvement stores like Home Depot or Lowe's should have wooden bases available.
- Epoxy glue: You can find epoxy glue at any hardware store or online.
Geometric Wire Earring Holder

For a minimalist and modern look, create a geometric wire earring holder. Using wire, shape it into a unique design and then spray paint it in the color of your choice. Not only will it look great, but it will also keep your earrings organized and easy to find.
Materials:
- Wire (20-24 gauge)
- Wire cutters
- Pliers
- Spray paint
- Newspaper or cardboard to protect your work surface
Instructions:
- Choose a design for your earring holder. Some ideas include a triangle, hexagon, or diamond shape.
- Cut a length of wire that is long enough to create the outline of your design.
- Using your pliers, bend the wire to create your chosen shape. Make sure to leave some extra wire at the ends to attach to the base.
- Cut two shorter lengths of wire to create the support legs for your earring holder.
- Attach the legs to the base of your earring holder by wrapping the ends of the wire around the base and securing with pliers.
- Use wire cutters to create small hooks along the length of the wire. These will be used to hang your earrings.
- Once your design is complete, spray paint it in the color of your choice. Make sure to do this in a well-ventilated area and protect your work surface with newspaper or cardboard.
- Allow the spray paint to dry completely before hanging your earrings on the hooks.
Where to buy items:
- Wire, wire cutters, and pliers can be found at most craft stores or online.
- Spray paint can be found at hardware stores or online.
Sea Shell Earring Holder
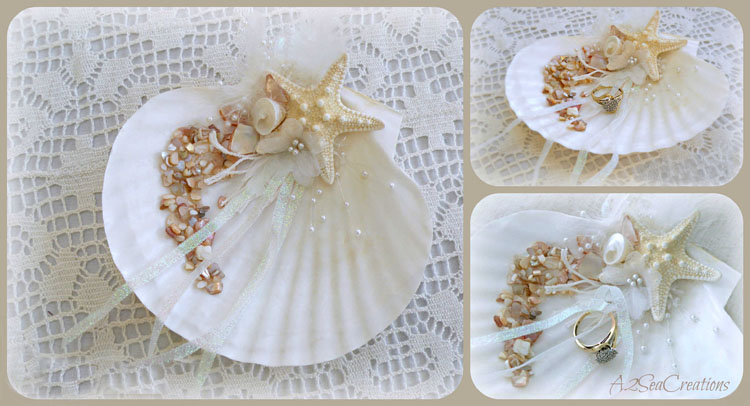
If you love the beachy vibe, repurpose a sea shell by attaching it to a wooden base and using it to display your earrings. This option is perfect for those who have a collection of beach-inspired earrings or just want to add a touch of the ocean to their decor.
Here are step-by-step instructions on how to make a sea shell earring holder:
Materials:
- A large sea shell
- A wooden base
- Glue (such as E6000 or hot glue)
- Sandpaper
- Paint or stain (optional)
Instructions:
- Start by cleaning your sea shell thoroughly, making sure to remove any dirt, debris, or sand from the inside and outside of the shell.
- Using sandpaper, sand down the bottom of the shell until it is flat and even. This will help the shell sit properly on the wooden base.
- If desired, paint or stain the wooden base in a color of your choice. Allow it to dry completely before moving on to the next step.
- Apply a generous amount of glue to the bottom of the sea shell and press it onto the center of the wooden base. Hold it in place for a few minutes until the glue sets.
- Once the glue has dried, you can start using the sea shell to hold your earrings. Simply place the earrings through the holes in the shell, or use hooks or wires to attach them to the shell.
- If you want to add some extra stability, you can add more glue around the base of the shell where it meets the wooden base. Allow it to dry completely before using.
Where to buy items:
- Sea shells can be found at craft stores, beachside gift shops, or online on websites such as Etsy or Amazon.
- Wooden bases can be found at craft stores or online on websites such as Michaels or Amazon.
- Glue and sandpaper can be found at any hardware or craft store.
Store-Bought Earring Display Case

If you don't have the time or resources to create your own earring display case, there are plenty of store-bought options available. From simple and practical options to more ornate and decorative choices, there is a display case for everyone. Check out websites like Etsy or Amazon for inspiration and to find the perfect display case for your style.
There are no specific materials needed for purchasing a store-bought earring display case, as it will come pre-made. However, it's important to consider the materials used in the display case and ensure they are of good quality and will properly hold your earrings.
Store bought earring display case
Instructions:
- Determine what type of earring display case you need based on your collection size and style preferences.
- Look for display cases that have enough compartments or holders for all of your earrings.
- Consider the material of the display case - do you prefer wood, acrylic, or metal?
- Make sure the display case is easy to use and access, and that it is stable and secure.
- Once you have your display case, arrange your earrings in a way that makes sense for you and your collection. You could organize them by color, style, or size, for example.
- Place your earring display case in a prominent and convenient location in your room or closet.
Section 3: Tips for Maintaining Your Earring Collection
In addition to organizing your earrings, taking care of your earrings is important to ensure that they maintain their shine and do not get damaged.
Here are some tips to keep your earrings in top shape:
- Regular Cleaning: Regularly clean your earrings with a soft cloth or jewelry cleaning solution to remove dirt, oil, and other residues. Avoid using harsh chemicals or abrasive materials that could scratch or damage your earrings.
- Proper Storage: When you're not wearing your earrings, store them properly in a designated place, such as a jewelry box or a specific compartment in your earring display case. Avoid storing them in areas that are exposed to direct sunlight or high humidity, as this can cause damage to some materials, such as pearls or delicate metals.
- Handling: When putting on or removing your earrings, be gentle and avoid pulling or yanking them. If you have sensitive ears or skin, consider wearing hypoallergenic earrings or those made from materials that are less likely to cause irritation.
- Maintenance: Check your earrings periodically for any signs of wear or damage, such as loose stones or broken clasps. Have them repaired by a professional jeweler if needed.
By following these tips, you can keep your earrings looking their best for years to come.
By now, you should be inspired to organize and display your earring collection in a creative and unique way. Remember, organization and maintenance are key to keeping your earrings in good condition, and a well-displayed collection can add a touch of style to your decor.
We encourage you to try one of the 10 creative earring display case ideas we shared and to consider adding new earrings to your collection.
Which one would you prefer? Let us know in the comments below!
Don't forget to share your creations with us and shop for new pieces to add to your collection!


5 comments
Oh my goodness….so many wonderful ideas for displaying your jewelry. I have always loved the tree idea. The vintage tea cups and wine cork ideas are new ones for me and I love them both. Thanks for sharing such great ideas for organizing jewelry and yet still making it look pretty!
These earring holders are so creative. My favorite is the branch earring holder. I just may give that one a go! Thanks for sharing such great ideas!
So many great ideas! Thank you! I love the peg board the best. I would like to do that one.
I adore earring. I always buy whenever I’m in a new place. Especially love the teacups, wine cork and cork board displays. Such a fun post!
Oh my gosh these are so creative and cool! And they make great conversation starters!! Thanks so much for sharing they’re amazing.